Last updated: September 10, 2026
Key Takeaways
- Check the next 24 to 48 hours of weather first.
- Stamped concrete usually needs about 7 days before light foot traffic and 28 days to cure fully; consult a professional for your project.
- Here is the practical timeline I would use: First 24 hours: Keep all traffic off the slab.
- Drop below about 40°F too soon, and curing slows sharply.
How long does stamped concrete take to install and cure? On site, stamped concrete usually takes 2 to 5 days to install, then about 7 days before light foot traffic, and around 28 days to reach full cure; consult a professional for your project. Big slabs, cool or damp weather, a complicated pattern, or extra base prep push the schedule out. And if you are talking with contractors, the real question is not “How fast can you start?” It is, “When can I walk on it, put furniture on it, and drive on it?”
Who this answer applies to, and what I’m assuming you already know
This is for a homeowner or property manager planning a patio, walkway, driveway, pool deck, or small commercial slab with a stamped finish. I’m assuming you already know stamped concrete is poured concrete that gets colored, textured, and sealed to mimic stone, brick, slate, or wood.
I’m also assuming the job is a normal exterior residential project, not a retaining wall, a structural slab, or a concrete repair tied to a major foundation issue. For a typical patio or driveway, four things drive the timing: site prep, pour size, weather, and curing. Cure means the concrete keeps hardening after it is placed; the surface may look finished in a day, but the slab is still gaining strength for weeks. Consult a professional if you are unsure how that applies to your slab.
The broad answer is simple: installation is fast; curing is not. A contractor may finish the visible work in one long day for a small patio, but that does not mean the slab is ready for use. Honestly, I’d treat any “same-day use” promise as a red flag unless the contractor explains exactly what they mean by use, what mix they’re pouring, and what the weather forecast looks like for the next 48 hours; consult a professional before agreeing to a schedule. Sounds tidy on paper. Reality usually isn’t.
For a typical residential job, I’d expect:
- 1 day for demolition or base work if needed, separate from the pour
- 1 day for forming, reinforcing, pouring, coloring, and stamping
- 1 to 2 days of protective care and no traffic
- 7 days before light foot traffic is usually reasonable
- 28 days for full cure under standard concrete practice
If you have tight scheduling around a party, vehicle access, or a pool opening, stamped concrete is not the fastest finish to choose. Worth the wait? Usually, yes. But only if you plan for it honestly.
How long does stamped concrete take to install?
How long does stamped concrete take to install? It usually takes one full day for a small project and 2 to 3 days for most residential projects, with bigger or more complex slabs taking longer. The job is not just dumping concrete and pressing a mat into it. There is a chain of steps here, and any one of them can slow the whole thing down if the crew rushes.
Here is the usual sequence:
- Lay out the area and set grades. Strings or stakes usually mark the slab shape, slope, and edges, and the crew checks that water will drain away at about 1/8 to 1/4 inch per foot. Verify that door thresholds, steps, and downspouts are accounted for. A problem shows up if the slab would slope back toward the house or pool.
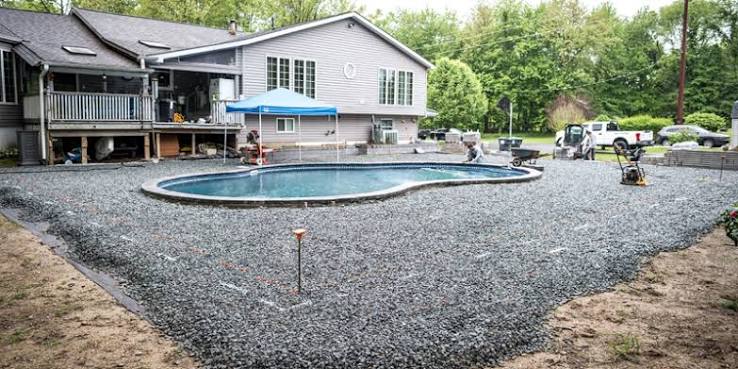
- Excavate and prepare the base. Soil is removed to the needed depth, then compacted gravel or crushed stone is installed, often 4 to 6 inches for a patio and more where loads are higher. Verify the base is firm and even, not soft or rutted. A problem shows up if footprints leave dents or if the subgrade pumps water.
- Build forms and reinforcement. Wood or metal forms set the slab edges, and reinforcement may include rebar or welded wire mesh depending on the design. Verify forms are straight, braced, and at the correct height. A problem shows up if forms bow when pressure is applied.
- Schedule the pour around weather. Concrete should not be poured into active rain, freezing conditions, or extreme heat without a plan. Check the forecast for the next 24 to 48 hours. A problem shows up if rain is likely before the surface can be finished and protected.
- Place the concrete. The truck or pump delivers the mix, typically in one continuous placement for the slab section. Verify the crew keeps the surface at the planned thickness, often about 4 inches for many residential slabs, unless the design calls for more. A problem shows up if the mix is overwatered to make it easier to place.
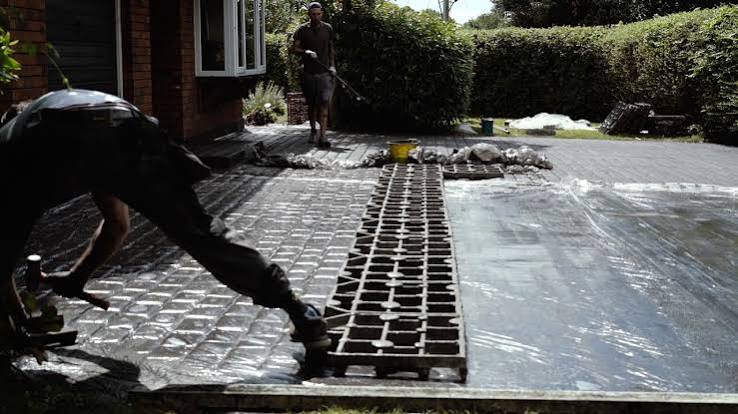
- Color, edge, and stamp at the right set. The slab must stiffen to the right plasticity before stamping. “Plasticity” means it is still workable but not soupy; too wet and the pattern blurs, too dry and the texture tears. Verify the crew tests a corner before committing to the full pattern. A problem shows up if footprints sink too deeply or the stamp leaves shallow, uneven impressions.
- Cut control joints. Control joints are planned cuts that help steer shrinkage cracks. They are often 1/4 the slab depth in many standard installations. Verify the joints are placed where the contractor designed them, not where they’re easiest to cut. A problem shows up if the slab has long, unbroken runs with no crack-control layout.
- Apply release and initial protection. Release powder or liquid helps the stamps lift cleanly, then the surface is protected while it firms up. Verify the finish is uniform and the edge details are clean. A problem shows up if the texture looks smeared, flattened, or doubled in places.
A small straight patio may be poured, stamped, and cleaned up in a single day. A larger driveway, especially one with color hardener, borders, steps, and saw-cut detail, can run into a second day for finishing and a third for cleanup or sealing prep. If the contractor says the whole project is “done” in a few hours, I would ask what they are leaving out.
How long does stamped concrete take to cure?
How long does stamped concrete take to cure? It usually takes about 7 days before light foot traffic and 28 days to cure fully; consult a professional for your exact mix and weather conditions. Those are not just calendar numbers; they track how concrete gains strength over time. The top may feel hard after a day, but hard is not cured.
Here is the practical timeline I would use:
- First 24 hours: Keep all traffic off the slab. The surface is still vulnerable to marring, rain damage, and edge breakdown.
- Days 2 to 3: Light touch-ups, if any, and continued protection from heavy use. No ladders, no furniture dragging, no carts.
- Around day 7: Light foot traffic is usually acceptable for many standard exterior slabs if the weather was normal and the contractor agrees.
- Around day 14: Light furniture can often be placed carefully, but dragging still risks scuffing the sealer or pattern.
- Around day 28: The concrete has reached its typical design-age cure and is ready for normal long-term service.
Temperature, humidity, slab thickness, cement mix, and whether the slab was sealed all change the wait. Cooler weather slows cure. Hot, dry air can make the top dry too fast, which is not the same as proper curing. A slab in a shady, damp area may look okay and still need more time before sealers or heavy use. Consult a professional if your site has unusual exposure or drainage.
If you are dealing with a driveway, I would be stricter than for a walkway. A passenger vehicle should not go on a fresh decorative slab until the contractor says it is ready, and in many cases that means waiting longer than the minimum foot-traffic window. Driveway loading puts concentrated stress on a slab that is still building internal strength.
One trade-off matters here: sealing too early can trap moisture or interfere with curing. A contractor should know the sealer type and the minimum wait before applying it. If nobody can explain whether the slab is curing under a curing compound, plastic, wet burlap, or just ambient conditions, that is not a detail to shrug off.
What changes the schedule in real projects?
The schedule changes most when size, weather, access, and detailing change. Obvious? Sure. But standing in a yard with a concrete truck waiting tends to make the obvious feel less obvious. The variables below matter more than sales talk does.
A small 150-square-foot patio with easy access can often be installed in one day and ready for careful foot traffic in about a week. A large 800-square-foot driveway with borders, multiple color tones, and saw cuts may need 2 to 3 days on site and more patience before use. Steps, curves, and tight corners slow stamping because the crew has to work each section while the mix is in the correct set window.
Weather is the other big variable. In hot weather, concrete can set quickly, which compresses the stamping window. In cool weather, the crew may get more working time, but the cure stretches out. Rain during the first day can stain, pit, or wash away surface color if the slab is not protected. Freeze risk is even worse; fresh concrete that freezes before it gains strength can be permanently damaged.
Ground conditions matter too. If the soil is soft, wet, or expansive, the crew may need thicker base stone, more compaction, or better drainage. That does not just change price; it can add a day or more before the pour even happens. For clay-heavy yards, I would ask whether the base will be compacted in lifts and whether the contractor expects to install geotextile fabric. Those details tell you whether the slab is being built to last or just poured over a problem.
The finish itself changes timing. A simple single-color stamp is faster than a job with multiple colors, borders, and a random-stone pattern. Deep texture patterns also demand better timing at stamping, which means more labor and less margin for error.
The mistakes that stretch the job or ruin the finish
The worst stamped concrete problems are usually not dramatic. They are timing mistakes, and they show up as an ugly surface, early cracking, or a slab that never quite looks right.
-
Pouring in bad weather. Rain, wind, and temperature swings can ruin the finish or force the crew to stop. The consequence is patchy color, washout, or delayed curing. The correct move is to reschedule or protect the slab with a real weather plan, not hope.
-
Stamping too early or too late. If the mix is too wet, the pattern slumps; too stiff, and the stamps will tear the surface. The consequence is blurry texture or damaged edges. The correct move is to start with a test impression and work section by section.
-
Skipping control joints or placing them badly. The consequence is random cracking that has nowhere to go. The correct move is to plan joints before the pour, not after the slab has set.
-
Adding too much water on site. The consequence is weaker concrete, more shrinkage, and a surface that may dust or scale sooner. The correct move is to order the right slump from the plant and use admixtures, not hose water.
-
Sealing before the slab is ready. The consequence can be trapped moisture, clouding, or premature sealer failure. The correct move is to follow the sealer manufacturer’s cure window and the contractor’s guidance.
-
Using the slab too soon. The consequence is imprinting, edge damage, and surface wear that should not happen on a fresh finish. The correct move is to respect the 7-day and 28-day milestones unless the installer gives a specific different schedule.
If you are comparing bids, ask each contractor how they handle rain, when they cut joints, and what they do if the mix starts to set before stamping is finished. The answers will tell you more than the quoted price.
When the standard timeline does not apply
The standard timeline changes when temperature, slab thickness, traffic load, or site constraints are unusual. I would expect a different plan in these cases:
- Cold weather near freezing: The pour may need blankets, insulated forms, or a postponed schedule. If the slab gets below about 40°F too soon, curing slows sharply.
- Hot, dry weather above about 85°F: The crew may need faster placement, evaporation retarders, and tighter finishing windows. Otherwise the surface can crust before stamping is done.
- Large driveway or commercial entry: The slab may need more than one day of placement or a phased schedule. Heavy vehicle traffic should wait longer than foot traffic, often beyond the first week.
- Slab over poor soil or a repair tie-in: Excavation, base correction, or subgrade stabilization can add time before any concrete is poured.
- Complex decorative work: Multiple colors, saw-cut patterns, and borders lengthen the install because each step has to be timed separately.
If a contractor gives you a one-size-fits-all answer like “three days total,” I would press for the details. A 200-square-foot backyard pad and a 1,200-square-foot driveway are not the same job, even if both get stamped.
For code and placement basics, the American Concrete Institute has guidance on concrete construction and ACI 302 floor/slab recommendations, and the Portland Cement Association has plain-language curing guidance that is worth reading before you sign anything. The National Ready Mixed Concrete Association also publishes practical curing and placement resources.
How much should you expect to pay, and what are you really paying for?
Stamped concrete usually costs more than plain broom-finish concrete because you are paying for labor, pattern work, color, release agents, and sealing, not just the slab. I’m not going to pretend there is one clean price per square foot, because local labor rates and site access matter too much. A simple job in an easy backyard costs less than a complex driveway with borders and demolition.
What matters is how the estimate is broken down. A clear bid should separate:
- demo and haul-off
- base prep and compaction
- forms and reinforcement
- concrete placement
- stamping and coloring
- sealer
- joint cutting